Coloring Sketches in Gimp
This is the method I use to color my sketches using GIMP. Basically what it amounts to is extracting linework from a scanned image, putting it in its own layer and then painting in shadows, highlights and colors behind it. I tend to paint using layer masks; filling a layer completely with a color/pattern and then masking out regions that shouldn't be visible, as opposed to erasing them. This is a non destructive way of coloring. It might seem like a chore but comes handly when you have a few dozen color layers with different blending modes. All you have to do is mask/unmask parts of the layer using white color to make things visible and black color to make things invisible.
Step 1
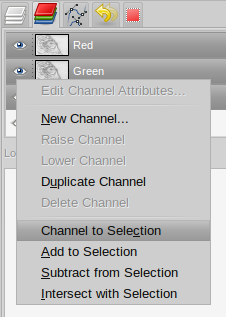
Start by scanning a sketch in with at least 300dpi, preferably in a lossless format like png. Open it up in Gimp, go to the Channels tab and highlight all the channels except Alpha.
Right-click on the selected channels and pick Channel to Selection. Then inverse selection: Ctrl + I (Select > Invert).
Step 2
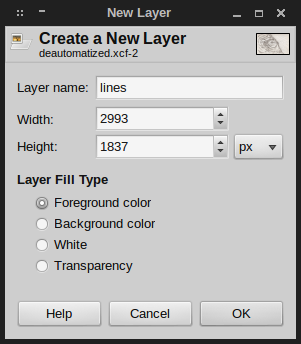
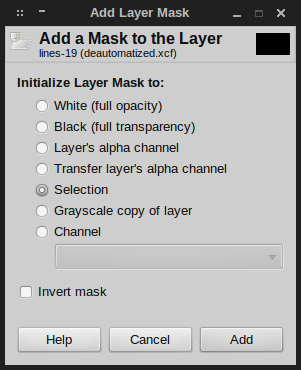
Create a new layer Ctrl + Shift + N (Layer > New Layer...). Name it something appropriate and set Layer fill type to Foreground color [2]. Next, add a layer mask; make sure the newly created layer is selected in the Layers Tab, then do (Layer > Mask > Add Layer Mask). Tick the Selection option in the dialog that pops up and add the mask [2]. Deselect everything Shift + Ctrl + A (Select > None). Also, hide the original scanned image layer in the Layers tab.
At this point I usually paint midtones, shades and highlights under the linework.
/* Now you can create layers for shades, highlights and colors under your linework to color the sketch. I prefer to make a white background layer first, so the linework is easier to see. That's pretty easy to do, just create a new layer with white fill. Move it under the layer with lines you made before.
Time to add some color. Select a foreground color in the toolbox. Then create a new layer and tick Foreground color in the dialog. Add a layer mask with full transparency. The layer will become invisible for now, you'll reveal parts of it later. Use Path tool to select area(s) to be colored in. Then add it to selection by doing Select > From Path. */ [pic of selecting a color] [pic of layer mask applied] [pic of path tool being used] [pic of select from path]
If you accidentally loose your path selection you can always retrieve it from the Paths tab. To edit a mask, select it in your Layers pallete and use a Paintbrush tool with black fill to hide or white to show areas. You can press X to switch between black and white fills.
[pic of paths tab] [pic of mask editing 1] [pic of mask editing 2]
Repeat for every major color you want to have in your image. Don't forget that you can blend and blur layers. For shading you can duplicate the original layer and blend it with Overlay or Darken, then mask up the lighter areas. Same idea can be applied for highlights.
[pic of blending layers] [pic of blurring layers] [pic of shading]